
6 key settings for smarter posting in Chrome on Android
Oh – hey all. So, you prefer uncovering amazing advanced powers for the Android phone browser, perform ya? You’ve completely explored all of the carefully concealed configurations for better browsing in the Chrome Android app from last week, and you’re back again for even more currently? My, you are usually a tenacious small monkey.
Well, you’ve arrived at the right location, my fellow primate, for I furthermore enjoy unearthing remarkably interesting out-of-sight configurations. And I am doing a lot of digging in the Chrome Android browser lately – so much, actually, that I’ve got a complete other established of easily ignored treasures to exceed the browsing-centric batch we already brought into our lifestyles.
This group of secret Chrome Android settings revolves around sharing – y’know, the timeless act of taking something you see on these here interwebbular supernodes and sending it to some other human and/or amphibian (and maybe even just into another app on your own phone on your own personal saving). I have no idea about you, but I find myself carrying out that dance 7 around, a day 427 times, on average. Therefore I’m basically delighted to notice some interesting new methods to ensure it is faster, easier, and more effective even.
Before we resume our virtual spelunking, i want to give you my regular Chrome-on-Android explorer’s warning: The settings we’re going to excavate are just about all linked to Google’s Chrome flags system. That is clearly a place for choices which are actively being done and aren’t technically designed for mainstream use – and therefore, it has some effective advanced options which could really screw things up in the event that you aren’t careful. (In addition, it evolves frequently, so it is entirely possible a few of the configurations we discuss here could look various as well as disappear entirely later on.)
So long as you follow my instructions thoroughly and do not mess with other things you encounter, you will be fine! But prodding around beyond the precise steps we discuss isn’t something I’d advise here, as it may lead to eternal doom for several of humanity (insert dramatic bwah-hah-hah-style cackling right here). Or, um, y’understand, your browser acting weird for some time just.
Either way, stick to this path, and unseen stupendous posting treasures shall soon become yours previously.
Shall we?
Chrome Android environment No. 1: The deep-link sharing device
Normal readers of my Google android Intelligence newsletter understand how much I enjoy Google’s awkwardly named Link to Text Fragment add-upon for the Chrome desktop computer browser. With the expansion in place, it is possible to highlight textual content on any website you’re viewing on some type of computer and after that right-click to locate a spiffy new choice for developing a link to a particular section of textual content within a internet page and sending it to another person.
So if, for example, I needed to point one to the description of the best setting from the initial section of this series, I possibly could generate a link like this – so when you open up it in Chrome or any compatible browser, you will be used that exact component of the web page, maybe even with the written text highlighted in yellowish for emphasis (based on what specific internet browser and kind of device you’re using).
Handy, right? I think so sure. But I’ve also constantly found myself disappointed with the truth that the same perform isn’t on Android – roughly I thought.
I actually was pleased as a prickly pickle to find during my digging that there surely is actually now a method to enable the same establishing in Chrome on the Google android side. Here’s how:
- Begin by typing chrome:flags in to the address bar within the Chrome Google android app.
- Next, kind the word highlights in to the search package on the display screen that arises.
- See the range labeled “Chrome Discuss text highlights on Google android”? Tap the container beneath it and modify its environment from “Default” to “Allowed.”
- And finally, tap the Relaunch button that presents up in the bottom of the display.
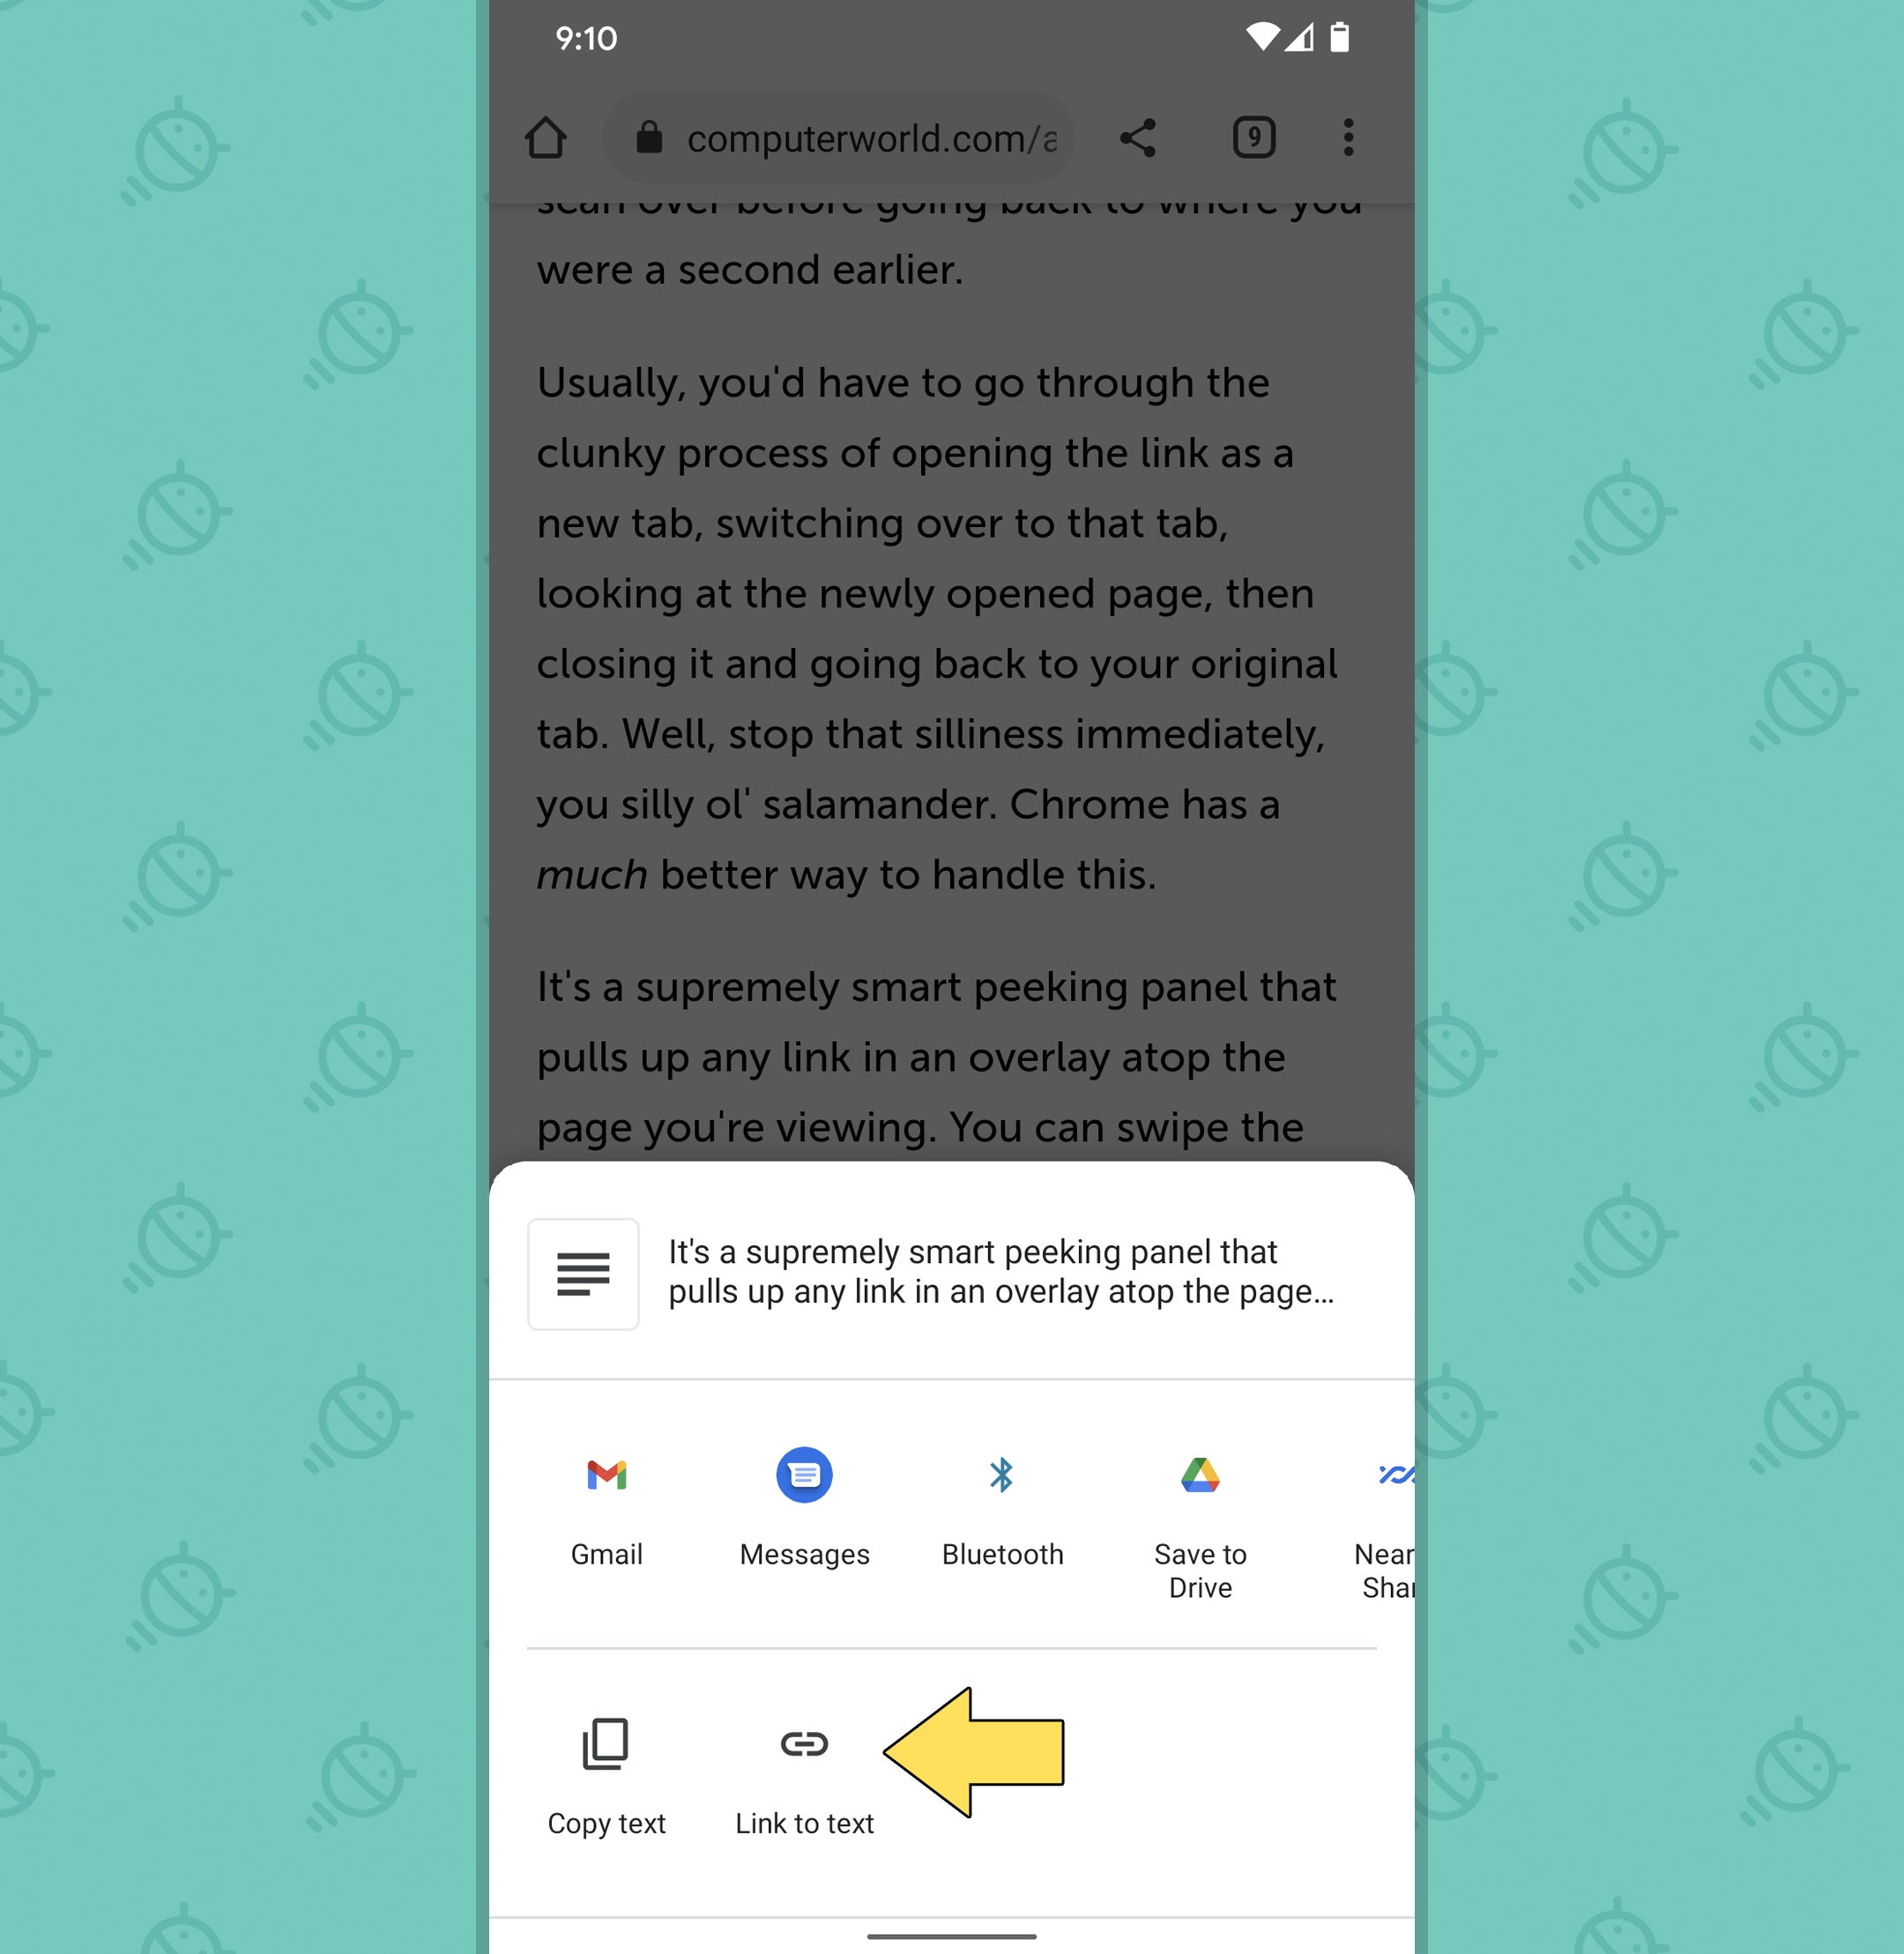
And that, my dear dingo, is all there’s to it. Now, simply start any ol’ website you prefer – maybe even that one, if you’re feeling specifically saucy – and contact and keep your finger for some text to emphasize it. Tap the “Reveal” command in the menus that arises, and…shazam:
 JR
JRThere, for the reason that Chrome sharing menu, you will see a shiny brand new “Connect to text” option. Tap it tap it with gusto -, gersh dern it! – and the hyperlink to the specific textual content you selected will undoubtedly be created. After that you can select any additional app where you intend to send it, and you do once, both the textual content you highlighted and the hyperlink to its exact area of the page will undoubtedly be pasted over.
And when anyone opens that link well -, my goodness, appearance at what goes on:
Enlightening, wouldn’t ya state?
Chrome Android establishing No. 2: The smarter screenshot editor
Next up inside our Chrome settings journey is really a helpful new solution to catch and adjust screenshots from correct within the Chrome Google android browser. Normally, you’d need to use the regular Google android screenshot system to achieve that, and the modifying tools immediately obtainable in that interface might or might not meet your needs.
With this particular special setting allowed, though, you’ll see a fresh “Screenshot” choice right within the typical Chrome sharing interface – the tiny panel that arises once you tap the Share choice within the browser’s major menu.
See?
Pound your own pinky down on that sucker, and you will be taken up to a secret program you won’t ever knew existed – a standalone Chrome screenshot editor, where one can crop, annotate, or put textual content onto any screenshot you catch even.
Lovely sassy molassy, that is useful!
To enable it is likely to browser:
- Once again, kind chrome:flags in to the Chrome deal with bar.
- This right time, type screenshots in the search box on the screen that arises.
- Find that labeled “Chrome Talk about Screenshots,” tap the package beneath it, and alter its placing from “Default” to “Allowed.”
- Tap the Relaunch key in the bottom of the display screen.
All that’s left would be to tap the Talk about command within the primary Chrome Android menus – the menu you open up by pushing the three-dot icon inside the browser’s upper-right part – and look for the brand new “Screenshot” choice to get started.
Chrome Android environment No. 3: The amazing cross-device clipboard program
Let me get ready you: This next key Chrome setting is quite forkin’ fantastic. It gets the possible to significantly save you period and make your daily life easier, particularly when you’re moving in the middle of your phone and pc throughout the day (as nearly all of us have a tendency to do!).
It is a super-powerful shared clipboard program that enables you to copy textual content from anywhere on your telephone and send it right to your computer’s clipboard – thus all you’ve gotta carry out from there’s hit Ctrl-V (or even Cmd-V, if you are a precious Apple individual) and the written text you copied on your own phone can magically appear anywhere you paste it on your pc.
I’m trembling just great deal of thought. Needless to say, it’s approximately 1 diploma outside where I’m right now, in order that might possess something regarding my quivery character. But either real way, this is exciting.
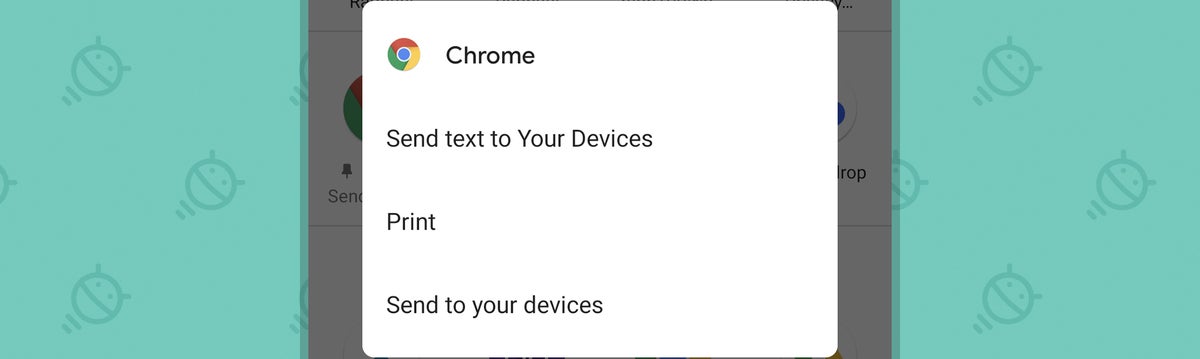
And there’s actually a lot more to it: Along with sending text to your computer’s clipboard, it is possible to beam hyperlinks over for easy opening right. And the ditto works in another direction, as well – for delivering links or textual content from your personal computer to your phone.
On the Android end, the choice appears within the standard Android sharing menu. So suppose, for instance, some text is had by you within an email that you would like to shoot to your computer. You’d just press and hold your finger to what you need within Gmail and select “Share” on the menu that presents up.
That’ll take one to that standard Android sharing panel, and there, you’ll notice just a little downward-facing arrow close to the term “Chrome” in the set of options. (And an additional benefit tip: You can even pin that specific function to the very best of the sharing menu for even easier access, if you are using Android 11.)
Tap that icon, and…
 JR
JR Well, wowzers in my own trousers. Wouldya look at that? Now, just choose the awkwardly capitalized “Send text to Your Devices,” and…
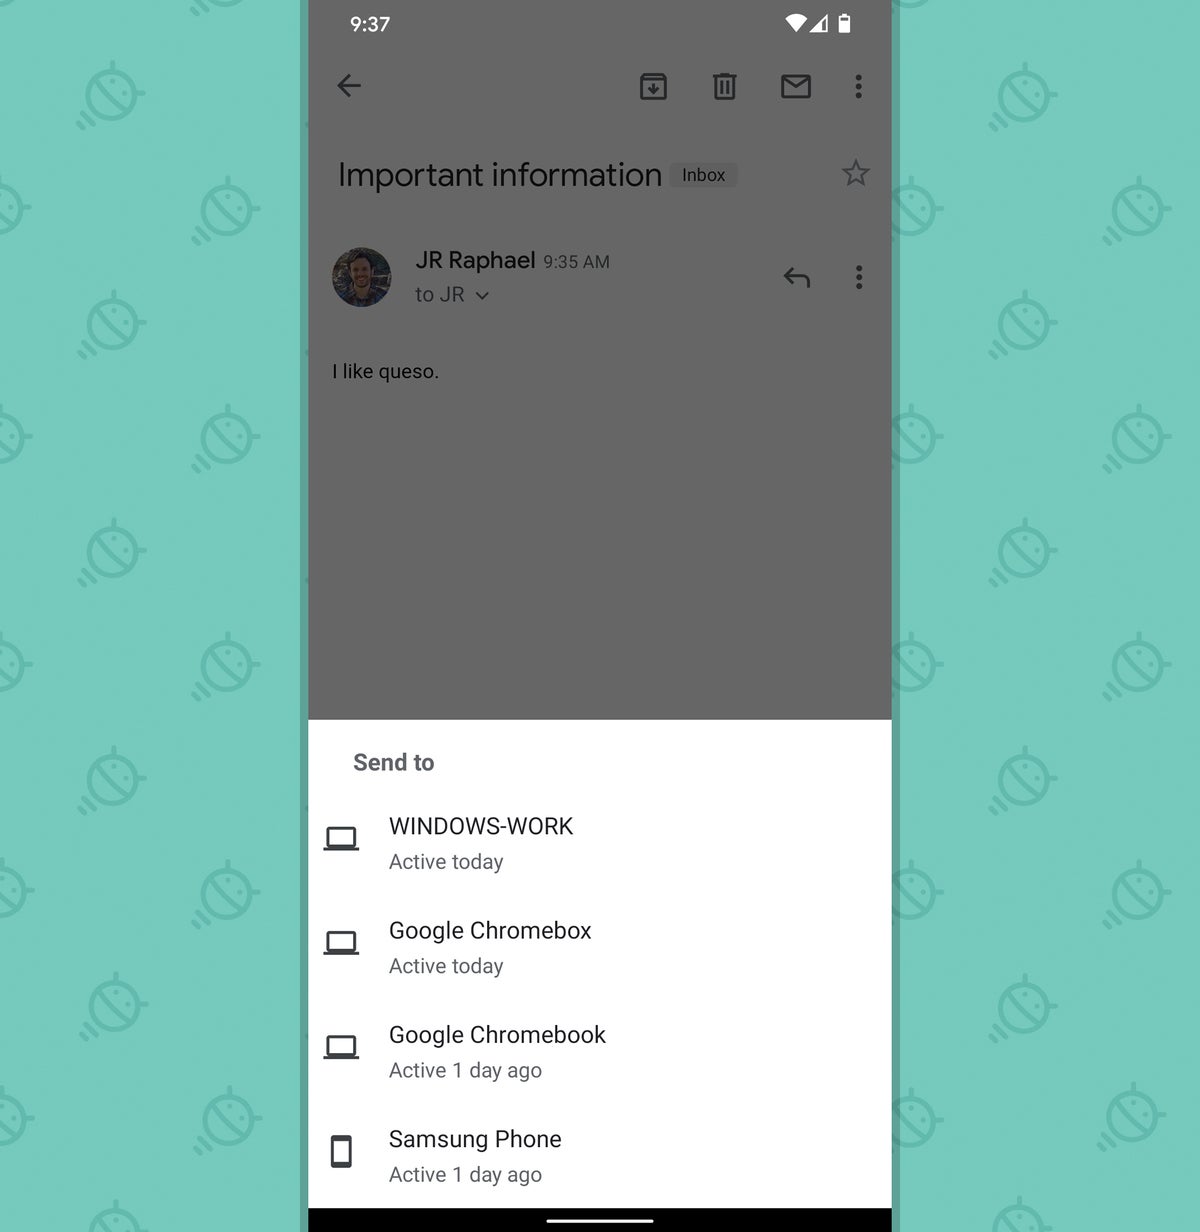 JR
JR Shabang.
If you were achieving this within Chrome on your own phone, by the real way, you’d need to scroll completely to the right one of many share options that initially comes up once you select and share text within the browser, then select “More” from there to access the typical Android sharing interface. If you wished to share a link rather than text, you’ll find an option to accomplish that within the custom Chrome sharing interface that arises once you hit the Share option in Chrome’s main menu. (Grumble, grumble, confusing interface and inconsistencies complications – trust me, I know.)
Things certainly are a little simpler with sending from the desktop side. There, you merely highlight any text on a full page or any link in the address bar of the Chrome browser, then right-click to get the “Copy to your device” or “Send to your devices” option.
Fine, so let’s understand this party started. First, on your own phone:
- Type chrome:flags in to the Chrome address bar.
- Type clipboard in to the search box near the top of the screen that arises.
- Tap the box beneath “Enable shared clipboard feature signals to be handled” and change its setting to “Enabled.”
- Tap the Relaunch button in the bottom of the screen.
Now, take a breath, ’cause we’ve gotta adjust a couple of settings using the pc side, too, before this’ll work.
In Chrome on your pc – be it a Windows PC, a Chromebook, or perhaps a $6,000 Mac with a $700 group of wheels attached:
- Type chrome:flags in to the browser’s address bar there.
- Type shared clipboard in to the search box on the screen that arises.
- See the line labeled “Enable shared clipboard feature signals to be handled”? Click on the box close to it and change its setting to “Enabled.”
- Now click to the search box near the top of the screen back, and this right time, type receive messages involved with it.
- Click the box close to “Enables the remote copy feature to get messages” and change its setting to “Enabled.”
- Last however, not least, click on the Relaunch button in the lower-right corner of the screen.
And with that, it is possible to go fetch yourself a cookie (browser-based or chocolate chip – your decision), for the clipboards are connected across all your Chrome-running now, Google-signed-in devices. Three cheers for simplicity, even though it’s weirdly complicated to attain it!
Chrome Android setting No. 4: The custom sharing shunning
So, remember all that stuff we were just discussing with the Chrome custom sharing menu? Y’know, like 30 seconds ago – about how exactly it’s clunky and confusing the way the Chrome Android app uses its custom sharing system rather than bringing you to the typical Android sharing interface?
 JR
JR Yeah – that is the one. I’ve pretty strong feelings about this practice, as you almost certainly now know by. And if it really is found by you as irritating when i do, boy howdy, have I acquired good news for you personally.
Turns out, there is a way to switch off that custom Chrome sharing interface entirely. And you do once, you share anything from Chrome anytime, you’ll be taken to the typical Android sharing setup – and never have to first scroll completely across that silly horizontal menu and tap the “More” button to obtain there.
There’s just one single caveat to the: Google has started building a few of its Chrome-specific features into that custom Chrome sharing menu – things such as the deep-link sharing and in-browser screenshot editing that people were just exceeding. So if you desire to be in a position to access that stuff, you need to suck it up and stick to the custom Chrome sharing setup.
If you aren’t thinking about using those features and would prefer to just remove that extra interface and go right to the typical Android sharing menu once you share anything from Chrome, though, here’s ways to do it:
- Type chrome:flags in to the Chrome Android app’s address bar.
- Type sharing hub in to the search box near the top of the screen that arises.
- Tap the box beneath “Chrome Sharing Hub” and change its setting to “Disabled.”
- Tap the Relaunch button in the bottom of the screen.
Whenever your browser back comes, try hitting the Share command within the primary Chrome menu (or selecting some text and hitting “Share” from there) – and…
 JR
JR Hip, hip, hooray! You’re back again to the Android standard menu, with all of one’s apps and sharing targets right before you and no problem finding. Thank Goog the option is at least available – for now still.
Chrome Android setting No. 5: A far more convenient Share command
With all this discuss sharing within Chrome, it’s tough never to think about the proven fact that the browser’s Share command is saved within the app’s main menu – meaning you must first press that three-dot icon before you find and utilize it.
I have no idea about you, but I share stuff from my browser constantly – be it sending a link to 1 service or another for my very own personal saving or sending a full page over to another person within an email. And always needing to start that main menu before I could reach the Share command results in plenty of wasted seconds throughout my day.
You’d never know it, but Chrome actually includes a setting that may fix that and simultaneously enhance your efficiency – by bringing the Share command front and center, directly into the address bar, where it’s never greater than a single tap away:
 JR
JR Actually, I’ve had it create that way in every of the screenshots in this story. Major bonus points in the event that you noticed!
If you’d like your Share command to surface in Chrome’s address bar like this for easier access, too, here’s all you’ve gotta do:
- Type chrome:flags in the browser’s address bar (yes, again!).
- Type share button into the search box at the top of the screen that arises.
- Tap the box beneath “Share Button in Top Toolbar” and change its setting to “Enabled.”
- Tap the Relaunch button in the bottom of the screen.
Say “Googledy, boogledy, bippity, doogledy” once and for all measure and/or an expedited way to insanity, and open your eyes to see your snazzy new Share button placement.
Chrome Android setting No. 6: Another top-button option
Okay, which means this last secret setting isn’t exactly sharing-related. But it’s a fascinating option to the setting we just went over, so that it was thought by me was worth including.
Because, hey – we are all different. Perhaps you don’t share stuff from Chrome quite frequently. Maybe using that invaluable single-button priority spot in the address bar for the Share command doesn’t make sense for you personally. And perhaps there’s some other function which could better use that space in your Android Chrome browser.
Well, turns out, you have another option. It is possible to swap out that address bar Share button with a microphone icon instead and present yourself an on-demand, one-tap solution to take up a new voice search with an individual tap of one’s spectacular fingie.
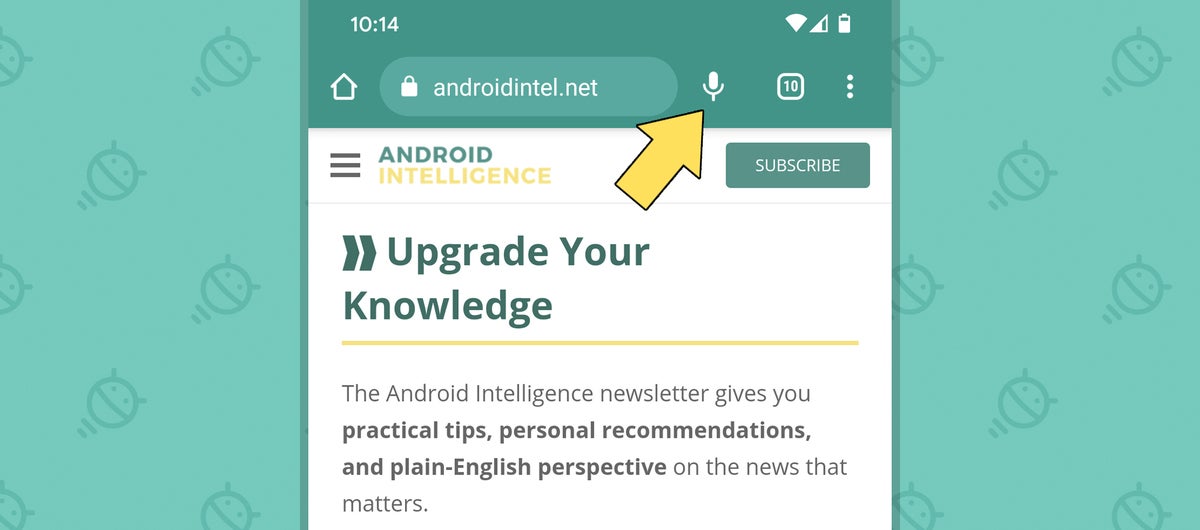 JR
JR Just touch your preferred phalange to the icon, and begin yappin’ away:
 JR
JR And even if you are insane enough to state something similar to “fishy fishy fishy” again and again (as just a truly deranged person would), you will discover yourself facing a screen filled with search results an instant later – no extra effort or unnecessary taps required.
To provide yourself the one-tap address bar search button:
- Type chrome:flags into the Chrome Android app’s address bar.
- Type voice button in to the search box on the screen that arises.
- Tap the button beneath “Voice button in top toolbar” and change its settled to “Enabled.” (Remember that, for obvious reasons, you’ll only have the ability to utilize this or the Share button setting. They don’t both interact.)
- Tap the Restart button in the bottom of the screen.
All that’s left would be to tap, tap, tap, and yap then, yap, yap. Ahh – if only all plain things in life could be so easy.
Want a lot more Googley knowledge? Join my weekly newsletter to obtain next-level tips and insight delivered right to your inbox.
